Sunday 27 October 2013

A Little Domestic Stitching


I have been busy making cosy cushions, my summer ones were looking a bit tired and I want to make the house look it's best for the Christmas celebrations. I have a huge stash of tweed and cashmere remnants that were just ideal for what I had in mind. Another two to go and that will be it.


I've used running stitch to put a wintry word on the front of each one.


I will put 'family' and 'friends' on the last two.

On Friday, husband and I had a day out in Grantham, we went to see the E.G. exhibitions at the Museum. Very enjoyable, I even sat and embroidered a little motif on the world's largest embroidery which is taking it's turn in Grantham. We also popped into Stitchcraft - what a lovely shop, venue for classes and a delightful cafe on site.
I shall be taking a little break from blogging for a week or so. I have a few medical appointments to get through and a class with Steph Redfern at Bramblepatch to look forward to. Be back soon.  


Thursday 24 October 2013

Transfer Paint


Finally managed to have a Trident meeting with my friends Jean and Jackie.  I'm really struggling health-wise but it has been such an enjoyable  day I don't care. We had decided to have a play with transfer paints today. These have been around for many years, in fact Jean had some in her stash that were over 20 years old. We also had some of the latest versions to use and compare.
I'm still in herbal mode so I slanted my experiments towards ways of producing yet another sub layer for my work.


I was looking for ways to make a subtle print that could take further work on top.


This method may crop up in my next piece of work only it needs to be toned down to just a whisper instead of a shout.
It was good to catch up and talk about exhibitions and contacts, we are building quite a network of crafters and textilers in this area.
I'm going to attempt an outing to Grantham Museum on Saturday to see the Guild exhibition, I hope it is still on.


We ended the day with some thread dyeing, I said I would leave them to take overnight, I don't know if I can last that long!  ( I can't).


Sunday 20 October 2013

Tarnished Stitches


I've missed a Guild meeting or two lately and one I really wanted to attend was Alysn Midgelow Marsden's Tarnished Stitches workshop. However my good friend Biddy bought me the kit round with written instructions on how to use it.


My first sample turned out ok so I thought I would try something a little more ambitious


I used an old stitched sample piece and added lots of tacky lace, beads, buttons and little stitched elements and then burned the edges.


This is it 30 mins after I used the  metallic paint and ageing solution, it takes several hours to develop completely. I will stitch and paint into it again tomorrow (and may be a bit more burning) and use it for a book cover. This is a real playful piece of work, just what I needed today.


Saturday 19 October 2013

Process Day 6 Completion


I finished Harvest Moon yesterday and by teatime it was up on my bedroom wall. I completed it  by giving it the curtain treatment, loose lining and a flat dowel in a channel along the top. It has the drape and weight I wanted it to have.

The finished piece.

The bedroom is the only ship free room in the house (my husband makes incredibly large model sailing ships among other things) so I have some pieces of my work on show in here. As we overlook fields and countryside my John Clare piece seems appropriate.


Including this blast from the past, a knitted wire, rubber and organza lampshade I made for my A level textiles some twelve years ago.


So  - a large piece of work completed in six days. I really recommend process sharing, it has motivated and organised my efforts. I was feeling a bit dithery about what to do next before I started this, but one thing has lead to another, as it often does and I'm envisaging my next project already. However before then I need to make some little 'pretties'.


Thursday 17 October 2013

Process Day 5


This has been my view for the past two days, it feels like miles of stitching has been achieved going round the edges of all those shapes.
Because my work is eclectic to say the least every piece is a learning curve (I like it that way).
I really had to grapple with some of the shapes , particularly the synthetic ones. The problem being that I couldn't use the iron at a high enough temperature to fuse the bondaweb to the background, slightly too hot and it would melt the synthetic. I resorted to a combination of bondaweb and tacking stitches on some of the shapes.  It was difficult sewing very close to the edge on some of my fabrics so where my needle wandered in, I cut back any edge that was visible. The sewing would have been much easier if I had backed my work but I wanted the option of having a drape to the piece.


All the machine stitching is complete. I need a day or so of looking to decide the next part and  to let my neck recover from such intense sewing. 

This  will hang in my newly decorated bedroom on a south facing wall. What I anticipate happening is the black linen to fade over time and the harvest moon will stand out more and more. 


Tuesday 15 October 2013

Process Day 4


After gilding my extended moon I have spent the day cutting the last shapes. I think this may be enough but I won't know for sure until everything is in its place. After ironing down in just the right position I have stitched my centre motif by free machining as close to the edge as possible, this took two hours. I console myself with the fact that I have done the most complex shape first. I decided not to back the work because the linen has quite a bit of body and I don't want it to look quilt like, when all the stitching is done I will add a backing of the same fabric. I have options then for stitching the two pieces together.


Now I can start to lay out the other 'stems' in relation to this focal point.


This will change I have no doubt, I need to put another 'mask' stem on the left hand side. It's almost a pity to have to flatten the stems with stitching, it has a wonderful 3D quality at this stage. When I am satisfied I will photograph for reference then remove all the loose pieces and start the process of pressing each one down, stitching it then move on to the next one. I will use matching threads except for any stems that need a bit more emphasis. This will keep me amused for a few days.


Monday 14 October 2013

Diversion


Two posts in one day but this one is only a little bit related to the process pieces I'm posting at the moment.
Most Mondays I spend in the workroom with my friend Paula. We have a go at anything and any technique that captures our imagination, I enjoy the break from whatever I'm currently creating. This week it was plastic. I have used a garden sack and a piece of pea netting,  a muesli packet and a little bit of a Sainsbury carrier bag. 
A smidge of printing, machine and hand stitching, a tad of burning and some careful ironing. I like the spontaneity of this piece.


What fun to use some throw away items, it stopped me being concerned about the 'preciousness' of the materials and forced me to concentrate on design stitch.


I loved the piece that Paula produced, her art background always shows in her work and we spark off ideas continually. 

I thought as I'm also running the harvest moon piece at the moment I would confess to an amendment to the work in progress. As it is such a big piece of work (36"x 60") I suddenly decided the moon was out of scale. It has only taken an hour to re-cut the mask and paint the under colour, when it is dry I will gild the extension and hopefully problem solved.


A harvest moon is meant to be big!


Process Day3


After I had cut all my shapes out I had to peel off the bondaweb backing paper, they came off easily and in one piece. I didn't want to throw them away because I thought they would make some lovely masks. The paper is very fragile and would fall apart the first time I used them so I painted each one with gel medium to try and give them some strength.


It took a couple of hours to dry out and then I pressed them flat. At this point I was going to store them for another project when I realised I could use them to make another layer of interest on my cloth.


I sprayed the shape with spray mount to hold it firm on the cloth and then using a Markel Oilstick (white) I coloured in the shape. Then using an old brush I stroked the pigment all round the paper shape. The spray mount held the mask perfectly.


After removing the mask I was pleased with the result. I have heightened the colours so that you can see the outcome, it is actually more subtle than the picture suggests.


I can start laying my fabric shapes over these stencilled areas tomorrow. I'm enjoying this part of the project, the hard slog will be when I start stitching all my shapes down.


Friday 11 October 2013

Process Day 2


I started by making my moon more moon like, by adding some rubs.


Then out with the drawings. I'm certainly getting some mileage from these.


I have a wide bondaweb that I get from Art and Stitch, ideal for backing large pieces. I gently peel the backing away from the gluey side and use this as my tracing paper.


I place this over my drawings and trace with pencil the element I want.


 I then make a sandwich with my fabric on the bottom, (in this case a synthetic florist wrap ) then a layer of bondaweb and the tracing on top. I cut everything to size to avoid wasting too many materials.


Then the most important part, parchment paper or any other non stick paper under and over the tracing. Hot iron - no steam.


Then it is ready to cut out, with a combination of scissors and scalpel. This is the most tedious part it can take up to an hour to cut a complex element out. I think there will be about a dozen parts in this piece so this part I will spread it out over the weekend.


I try to cut as elegantly as possible to capture the feeling of each plant stem. The art of pivoting the scissors to create curves takes a lot of practice and time. 


Then on to the next one ( just another ten or so to go).


I can't help but lay some of the 'stems' over my moon to see how they are going to look, a lot of cutting needs to be done before I start laying out properly. I'm using a mixture of silks, sheers, chiffon and synthetics to make up the plant life.
 I envisage the overall size being about 36" x 60" so quite a big piece of work. The decision I have yet to make is whether to use batting on the back or just another layer of black linen, I'll decide when I have everything bondawebbed in place.
I experimented with bleach discharging the background with some of my stem shapes but didn't like the colour achieved so discarded this idea.
I will post again on Monday.


Thursday 10 October 2013

Process - Day 1


My moon for this piece of work needed to be big, luckily this dish at 14" diameter fitted the bill nicely. Using freezer paper and a scalpel I cut round the circumference.


This is the piece I require.


Using a hot iron and no steam I pressed the freezer paper onto the linen background shiny side down.


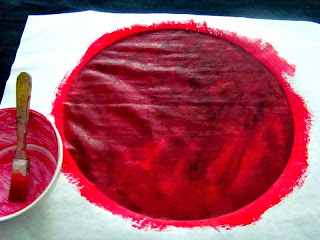
Because this is a harvest moon I want the colour to be warm behind the gilding so using a little fabric medium and magenta primary acrylic I paint a layer onto my fabric.


This is where a little patience is needed, it takes at least an hour sometimes more to dry thoroughly. It needs to be bone dry before the next stage.


Acrylic gold size has always been my choice for working on fabric, it will stay tacky for ages which is a big help with gilding. A thin coat is brushed on and left to 'cure' for at least 15mins. It should be sticky but not wet.


I leave the leaf (copper in this case) on its tissue backing and lay it face down on the sized ground. I go over it gently with a soft brush to make sure it has adhered, then carefully remove the carrier tissue . This piece took several sheets which I over lapped slightly. Fill in any 'holes' with tiny pieces of leaf until the surface is covered.


Using a soft brush gently remove all the surplus leaf.
This is the most satisfying part of gilding seeing the perfection of your shape appear.


Carefully lift the freezer paper off in one corner and gently remove.


Doing this revealed a tiny paint bleed, no problems a black felt tip took care of this.


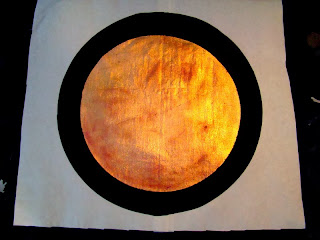
My harvest moon which I will allow to settle before I work into it with some metallic rubs to make it more moon like.